Watermark everything (Compression)
All to frequently, I see QuickTime Files called "Sequence 01.mov" or "Untitled Sequences.mov"
You know why this is bad right? Because you have no idea what that file is.
In the same way you should stay organized in your edit, you should name your sequences and watermark your work.
Being organized means no bins named "Stuff", "Misc.", "Other", or my favorite "Other Misc Stuff."
Naming your sequences means you can look at the file name and know what the sequence is meant for (Approval? Mastering? Client h.264 delivery?)
Watermarking your video helps your client understand what you're giving them. Every version except the final should have a watermark. It protects your work and helps your client know what it's meant for.
Compression Tips like this can be found by attending sessions at Post Production World at NAB (this link includes links to non-PPW sessions)
Another great range tool feature (Apple)
The range tool trick referenced here?
You can also use it to speed/up slow down a clip. Just select the portion you want to go slower or faster - just the specific area you want to adjust inside a clip.
If you choose any value under 30%? I'd suggest changing the View Quality (from the menu category) to Optical Flow (an method to create synthetic frames for smoother slow motion.)
FCPX tips like this will be in sessions at NAB/Post Production World
Find out if you've dropped frames (Premiere)
See the wrench on your Record monitor?
Go to it and check Dropped Frames indicator.
Now you can make smart decisions if Adobe Premiere Pro drops frames (is it serious? No, they'll all be there for output - but you may choose to render or degrade the playback resolution depending on if it drops frames/how many frames were dropped.
Adobe Sessions with tips like this will be at NAB/Post Production world
Quickly adjust/duck audio with the Range tool (Apple)
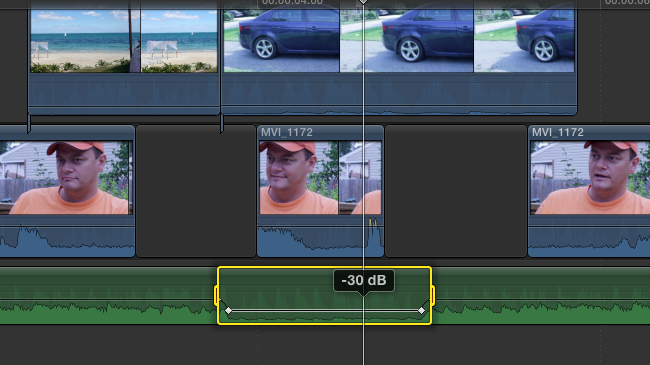
The Range tool (R) permits you do to all sorts of range based selections and adjustments.
One of the coolest is to use the range tool, select a part of music (or other audio element that you want to duck) and just pull down the Audio level line - FCPX will automatically add 4 keyframes to help you lower only inside that specific range.
FCPX tips like this will be in sessions at NAB/Post Production World
Compression's Biggest enemy: Noise
Noise is your enemy.
The simplest concept in compression is the idea that you average four nearby pixels together - if they're really similar? You can replace them with one piece of data (rather than the original four.)
Noisy footage happens at the source for two reasons: poorly lit and a very compressed starting point (I'm looking at you DSLR h.264 files!). The worse the starting point, the more important it is to shoot right - else you have to deal with noise, meaning it'll be harder to compress your footage.
Make sure to view this in full. the noise on the left hand side makes this file far harder to compress.
Compression Tips like this can be found by attending sessions at Post Production World at NAB (this link includes links to non-PPW sessions)
Yes, you can move clips like in FCP7 (Apple)
Did you know that merely switching to the Position Tool (P) will allow you to move/throw around clips like you did in FCP7?
FCPX tips like this will be in sessions at NAB/Post Production World
Most compression tools have the ability to set I/O points
When you're testing and tweaking your compression tool of choice, you'll probably should test what you're doing rather than just running the settings on your entire file.
Did you know that most compression tools permit the setting of In/Out points (as a test for your video?)
Compression Tips like this can be found by attending sessions at Post Production World at NAB (this link includes links to non-PPW sessions)
You might NOT want the list view (Apple)
When I first started using FCPX, I made a major mistake. I switched it from Frame view to a Text view. After all, my entire editorial career has been working from the list view.
I was totally wrong.
I used list views to change the name of clips and organize them that way (and especially to pay attention to their metadata.)
Except, of course nowadays, everything is overshot - meaning that It may not be worth it to fill out all that information.
FCPX handles frame view better, because it skimming through a finding a moment is a clip, as it helps you find a clip visually. The other big secret (the first being stay in frame view) is to change your zoom (Cmd + or - ) so that you can see 5 seconds. It's a perfect zoom level for skimming and selecting interview clips!
FCPX tips like this will be in sessions at NAB/Post Production World
Golden Rule of Compression
The Golden rule of Compression (above all others) is this:
Try to compress your video only once. Each time you compress your product, you're taking a chance and lowering it's final quality.
I keep seeing people use tools like Handbrake to rip a DVD into MPG4 and then use another tool, like Apple Compressor to make ProRes. That's taking a distribution quality codec (MPEG2) taking it to another distribution quality (h.264) and then to an editorial codec.
Try, when possible to only transform your video once - at the end of your editorial process.
Compression Tips like this can be found by attending sessions at Post Production World at NAB (this link includes links to non-PPW sessions)


